Shooting Tips
HIVIZ Shooting Tips
Whether you are a beginner or an experienced shooter, these HIVIZ Shooting Tips can help you improve your form and become a better shooter.
Shooting Tip #1: Determine Eye Dominance
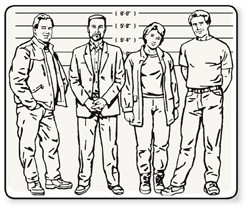
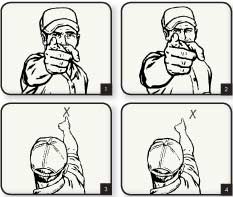 With both eyes open, point your index finger at an object across the room. Now close your left eye. If you are still pointing at the object, as in image #3, you are right-eye dominant. If it appears you are pointing to the side of the object, as in #4, you are left-eye dominant. There are varying degrees of eye dominance, but this simple test to see if you are affected. Previous solutions to cross-eye dominance ranged from switching shoulders to obscuring the vision of the offending eye, but HIVIZ Magni-Optics® technology solves it instantly.
Shooting Tip #2: Using the TriViz Sight as a Rangefinder
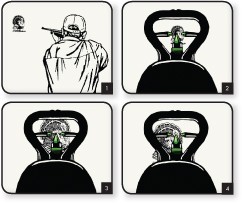 In addition to the accuracy advantages of the HIVIZ TriViz sight, it also has the ability to function as a rangefinder for turkey hunters. Shoulder the shotgun as the bird approaches and establish your sight picture. When the turkey’s body fills the rear sight frame, an average-sized tom is within range.
Draw a bead on the bird’s head and pull the trigger!
Shooting Tip #3: Change Your Stance on Report Pair
 It’s surprising how many people miss the second target of a report pair due to poor foot position. On a fast true pair you may have to compromise your set-up for both birds, but on a report pair there is often time to reposition your feet between shots.
Consider a report pair with the first trap throwing a target from your left side, quartering slightly left. The second bird is a dropping incomer that lands 25 yards out to the right of the stand. Attempt this pair with your feet set for the first target and your back muscles will be bound making it very difficult to stay on the second targets’ flight line. The result: a seemingly easy target winds up a miss.
If time allows, it is much more effective to shift your feet after the first shot and make a smooth move on the second target. Think of each target in a report pair and consider how you would set-up for the second target if it were a single. The same technique can be applied on gamebirds as well. After connecting with a first shot don’t instantly snap off a second shot off balance. Shift your feet slightly and make a smooth second shot to connect with that double.
Shooting Tip #4: Keep Your Cheek Against the Stock
 If you want to stop lifting your head when you shoot, try this: place a $20 bill between your cheek and the stock and agree with your buddy that if it hits the ground, he gets to keep it. Repeat as necessary.The worse your head-lifting habit, the more expensive the lesson!
HIVIZ Magni-Optics® technology can also help you keep your head on the stock. With Magni-Optics®, the sight picture only appears illuminated when you are properly aligned behind the sight. As soon as you lift your head, you will lose your sight picture. It’s a great tool to encourage proper shooting form.
Shooting Tip #5: Follow-Through
 There are three commonly accepted techniques for achieving forward allowance, or “lead”, on a moving target. They are sustained (maintained) lead, pull-away, and swing (pull) through. Which one you choose as your primary method is a matter of personal choice. However, to be a truly skilled shooter, it’s a good idea to get comfortable with all three methods.
Some target presentations may be more effectively shot with a different technique than your primary style. The springing teal is a good example. Depending on the other target in a pair you may have to attempt the teal rising, at its apex, or dropping. A large percentage of shooters will employ swing-through on the way up, sustained lead at the apex, and pull-away for the dropping teal.
During your practice sessions, you should practice with the different techniques on problem presentations and see what works best for you.
Regardless of the lead method you choose, follow-through is one of the most critical elements of a successful shot.
Shooting Tip #6: Overhead Shot
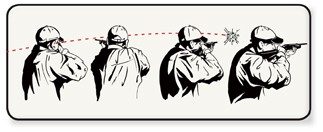
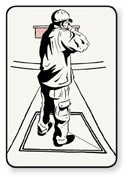
 Some presentations make it difficult to see the target before it gets to the breakpoint. One presentation many people struggle with is the fast overhead from behind, such as a high one on the skeet field and similar targets on sporting layouts. Seeing this bird before it gets to your breakpoint is critical to consistently breaking this target. Even leaning back may not give adequate visual reaction time. It’s surprising, but the culprit is often a baseball cap. Taking the cap off or turning your cap backwards opens up your peripheral vision so you can see the target as soon as it’s overhead. This provides that vital fraction of a second to allow your eyes to “coordinate” with your hands. It can actually appear to slow the target down, giving you ample time to make a smooth move to the clay.
Shooting Tip #7: Back Tension and Barrel Roll
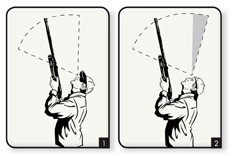
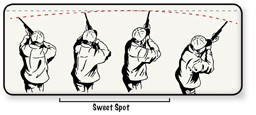 While every shotgunner has 180˚ of swing, it’s worth noting that not all of it is good. On the extreme ends of a shooters swing, back tension has a pronounced effect on how the barrel travels. As muscles in the lower back flex to accommodate movement, they force the barrel downward in a twisting motion.The result is often called a “rainbow swing.” For this reason, it is important to identify the “sweet spot” of your swing and preposition yourself so that you’ll be breaking the clay within that “sweet spot.”
Good shooting form is every bit as important as equipment modifications in managing recoil. Good form includes proper foot and body position relative to the breakpoint; a slight forward lean placing most of your body weight on your forward foot; and keeping your cheek tight to the stock until you see the target break. Hand placement and the amount of grip also play an important role in recoil management.
Shooting Tip #8: Cold Weather Shooting
 Waterfowl hunters face the problem of bulky winter clothing and many use a shortened stock length to accommodate their hunting parkas. But what happens when you need a bulky coat for colder, early morning conditions, but remove the coat for warmer, afternoon conditions? Try moving your front hand back an inch or two towards the receiver. This simple trick can make the gun feel noticeably shorter, and your gun will be one to two inches forward of your clothing when you start your mount.
Shooting Tip #9: Get a Grip
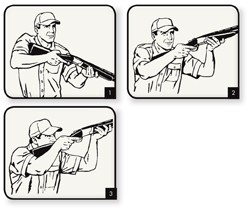
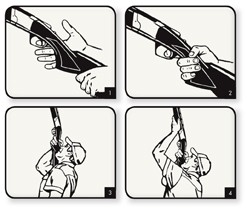 Proper grip with the back hand starts with the trigger finger. After pointing the muzzle in a safe direction and verifying that the gun is empty, place the crease of the first knuckle of your index finger on the trigger. Now bring your hand as far back and down on the grip as comfortable. The thumb of the back hand should wrap over the wrist of the stock giving a secure grip.
Now that your back hand grip is secure, use this technique to find the correct location for your front hand. Once again, make sure the gun is unloaded, then mount the gun and swing up until you are pointing straight up into the air. Maintaining control of the gun with your back hand, let go with your front hand and relax it. Now that your elbow is comfortably bent, reach up and regrip the stock. Note this location as it will allow maximum mobility.
Shooting Tip #10: Gun Fit
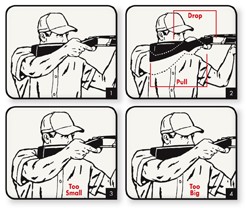 The fact is most shotguns can be made to fit most people by adjusting stock dimensions and balance. For new shooters, two dimensions are the most critical: drop and length of pull.
Drop is the measurement from where the cheek touches the stock to a line parallel with the rib. The drop must be sufficient so the shooter can see over the rib without lifting their head. Length of pull is measured from the curve of the trigger to the midpoint of the butt or recoil pad. This length must be long enough to keep clearance between the hand and face, but not so long as to hinder mounting or balance.
Shooting Tip #11: Finding the Best Instructor
 For many young shooters, the “best” instructor could be mom or dad if they possess basic shooting skills. For adults new to the sport, a friend is usually the first instructor. As long as the new shooter is being taught safety and is progressing at an acceptable rate, this can be a great way to get started. An instructor can be anyone from the local club, to someone certified by one of the national shooting organizations, to a world champion competitor. Instructor fees can range from a cup of coffee to hundreds of dollars per hour.
The “best” instructor is the person with whom you communicate well, has confidence in their ability to help you, and is affordable and available when you need help. Talk with other shooters and take a one hour session with a few different instructors and decide for yourself who is the best instructor for you.
Shooting Tip #12: Gun Mount and Drag
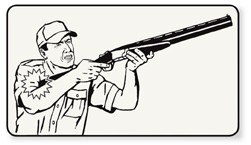
 One of the most common errors in shotgun shooting is starting the mount with the back hand. If the first move you make has both hands lifting in an upward direction, the gun butt will hang-up under the armpit. A correct mount always begins with the front hand pushing toward the target. Only after the gunstock has started its forward motion should the back hand begin lifting the stock towards the cheek. Perfecting a proper mount technique will allow the stock to arrive consistently at the cheek assuring proper rib-to-eye alignment.
Shooting Tip #13: Recoil
 Recoil, the unavoidable result of pulling a trigger, is the shooters arch enemy. Rifle shooters refer to “pulling the shot”; shotgunners call it “flinching”. Whatever we call it, the accumulative effect of recoil causes the subconscious mind to resist subjecting the body to yet another blow.
Preventing recoil issues is far easier than curing them. A gun that fits properly and the use of light recoiling ammunition are highly recommended. However, the most common accessory available to mitigate recoil is a good recoil pad. A good recoil pad must be soft enough to slow down and redirect the forces of recoil. It must also recover from its compressed state quickly enough to be ready for a second shot. Proper shape and texture enable a pad to mount quickly but must offer enough traction to prevent the recoil pad from moving on the shoulder between shots. All of the above attributes are incorporated into the XCOIL Recoil Pads from HIVIZ. Now there is no excuse for taking heavy recoil!
Shooting Tip #14: The Mid Bead
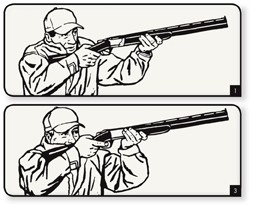
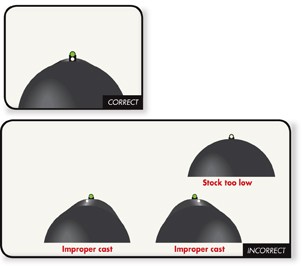 The mid-bead on a shotgun serves a very specific purpose for both the target shooter and the hunter. This purpose is to verify proper gun fit and a consistent gun mount. Consistent results on moving targets are dependent on a correct and consistent gun mount. A properly fitted shotgun will easily mount to the correct sight picture (see illustrations).
For clay target shooters that utilize a pre-mounted gun (skeet, trap, and sporting clays), the shotgun can be maneuvered in the shoulder pocket until the proper sight picture is attained prior to calling for the target. For the low mount shooter (FITASC and hunting), one can practice the gun mount using the mid-bead to verify proper sight picture. Continue that practice until you can duplicate the mount with ease and consistency.
Shooting Tip #15: Visual Focus
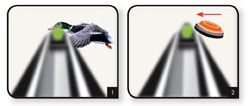 Competitors at the top of their game have learned the vital importance of hard focus on their target. The proper visual technique is to pick a specific target or bird and focus intently on it. If it’s a game bird, ones focus should be on its head (1). On clay targets, one should focus on the leading edge (2). This intense focus should be maintained through the delivery of the shot including follow-through. For the hunter, this means staying focused on one bird until you see it take the shot before going after a second bird. Likewise, the target shooter should maintain focus on the first target until it starts to break apart or it is clear that it was missed. Using intense specific focus will result in far fewer misses.
Shooting Tip #16: Trap Stance by Harlan Campbell
 A good stance is very important to your shooting succes. Your body and shoulders need to be at a 45-degree angle to the trap. Try to keep the gun mount along the center line of the post. Put your weight slightly forward on the lead foot and try to keep it there throughout the shot.
Shooting Tip #17: Selecting LitePipe Color
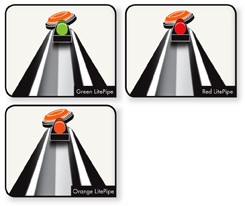 Which color LitePipe should I use? This is a very common question, and the answer has several considerations. When choosing a color, one should consider the following: contrast with the color of the target or of the surroundings; color blindness; desired intensity; and of course, personal preference. Which HIVIZ LitePipe can be seen the best? The human eye is most sensitive to the green LitePipe. Green will be the most visible in all light conditions, followed by orange and then red.
Handgun
Shooting Tip #18: Tactical Stance
The basic pistol stance is similar to that of a boxer. If you are right-handed, place both hands on the pistol and align your hips at a 45-degree angle in relation to the target. Your left leg is forward towards the target and your right leg is to the back. Your legs should be placed at a comfortable distance from each other – roughly 12 to 16 inches apart – forming a triangle. You should have equal weight distribution on both legs creating a comfortable standing position. Your upper body should be parallel or square to the target with your head up and shoulders slightly forward of your body. Your nose should be located directly over your toes on your left foot.
For left-handed shooters, the stance is reverse of the right-handed shooter.
Shooting Tip #19: Pistol Grip
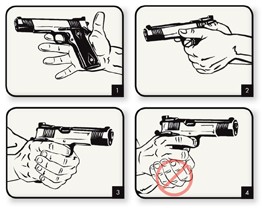 The primary concern when shooting any handgun is to have a good firm grip with both hands. Grip the gun with your strong hand as high on the grip frame as you can (1). Your support hand should grasp your strong hand with the support hand index finger under the trigger guard at the second finger joint (2).
Your trigger finger should touch the trigger no further than the first joint, preferably on the pad (3).
Avoid the “cup and saucer” grip (4) which provides little or no benefit.
Shooting Tip #20: Defensive Handgun Shooting
 A succesful defensive handgun shooting stance can be achieved by following these four steps:
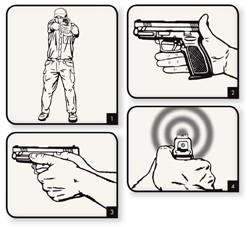
Power Stance (1): The power stance provides proper balance, ease of movement, and stability.
High Hold (2): Place the web of the thumb and shooting finger high on the back strap of the pistol.
Solid Grip (3): Obtain the same firm grip every time your hands come in contact with a handgun frame.
Front Sight (4): Your HIVIZ front sight should be “razor sharp” in your vision, centered in the valley of the rear sight, and placed on the spot you wish to place your shot before you put your finger on the trigger.
Shooting Tip #21: Focus
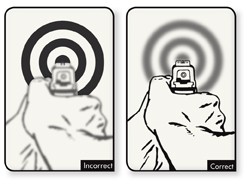 Shotgunners focus on their target and are aware of their sights, but it’s just the opposite for handgunners. Most combat and defensive handgun instructors preach “focus on your front sight and blur your target.” Front sight acquisition and focus are tremendously aided by a bright, highly visible front sight.
Implementing the hard focus on the front sight method will allow you to shoot your handgun more quickly and accurately. Try it the next time you go to the range and compare your speed and accuracy to any other shooting method.
Shooting Tip #22: Trigger Control
In close-quarter battle, a lot of people think that trigger control is the key to success. In our experience, a good, strong grip and a locked wrist are critical in shooting under close-quarters conditions. Trigger control is important, but it is not the most important fundamental in a CQB situation.
Shooting Tip #23: Trigger Finger by Jerry Miculek
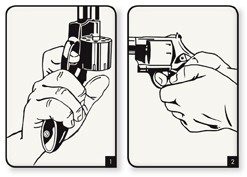 The key to a correct revolver grip is the placement of the trigger finger, and the key to fast revolver shooting is to keep the trigger finger square on the trigger (1) throughout its entire arc of movement. You never want your finger to leave the face of the trigger anywhere during the firing sequence. Get your hand as high as you can on the grip and still have the revolver functional. The web of the shooting hand is over the back strap (2), so when you fire you have enough clearance for the hammer to cycle. You want the centerline of the bore to be close to the centerline of your hand. Your hand is high on the grip with the barrel held low. Use of the non-firing hand is 70% of the control of the revolver. Use both thumbs, wrap them over, and pull tightly. The big thing is consistency to the presentation of the target.
Shooting Tip #24: Close-Quarter Shooting by Mark Hotaling
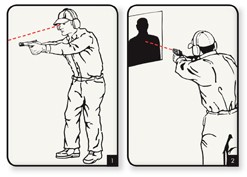 In extreme close-quarter shooting, accuracy is imperative and speed is critical. When the target is under three yards away, extend the pistol straight out and with both eyes open press the trigger while looking over the sights. Your HIVIZ sight will greatly increase your speed and accuracy and in this situation, instantly affirm your weapon is on target.
Tactical
Shooting Tip #25: Sight Acquisition
In diminished lighting conditions, it is very easy to “lose” the front sight post on an AR-15 rifle. Using a HIVIZ AR-15 front sight post can dramatically improve your front sight acquisition. Additionally, the HIVIZ sight will not create a “flare” when looking through night vision devices.
Shooting Tip #26: Co-witnessing
 Co-witnessing uses one sight system to zero or confirm zero of another sight system. In this tip, we are using back-up iron sights to co-witness an optic device because optic devices are susceptible to damage or failure.
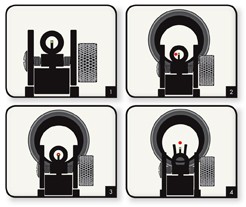
Co-witnessing a HIVIZ AR-15 front sight makes it viable to switch an optic device between rifles or for confirming zero if the optic has been removed or suffered damage. First, ensure zero of the HIVIZ front/peep rear sights (1) at the desired range (usually zeroed at 25 yards and confirmed at 100 yards). Next, install the optic device and view the dot through the peep sight with the HIVIZ sight centered as if shooting (2). Adjust the optic device until the dot is superimposed or forms a figure 8 on the HIVIZ front sight (3).
Take your first shot using the optic device. Raise your head until the dot appears in the center of the optic (4). Test fire to confirm point-of-impact at 100 yards and make any minor adjustments as necessary.
NOTE: This technique will not work with higher mounts or magnified optic devices such as the ACOG sight or conventional riflescopes.
Shooting Tip #27: Tactical Sight Picture and Stance by Mark Hotaling
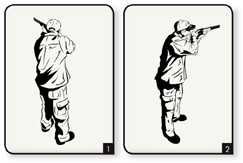
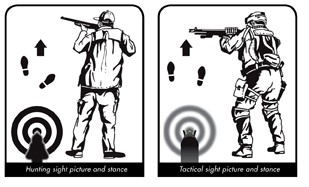 Hunting Sight Picture and Stance: While hunting birds or shooting clays, the shooter will have an off-set stance with his shooting side foot set back behind him. The sight picture should be two-eyes-open, focusing on the target with the sight in his peripheral vision.
Tactical Sight Picture and Stance: A tactical stance is very different than a hunting stance. The tactical shotgunner should have both feet roughly shoulder width apart, toes pointed at the target. The shoulders are nearly squared up with the target and the shooting side foot is only a couple of inches back from the other foot. The sight picture should be that of shooting a rifle or pistol: front sight aligned with the rear sight and when the trigger is pressed, your eye is solely focused on the front sight. With the proper tactical sight alignment, sight picture and front sight focus, the tactical shotgun can deliver extreme accuracy. The addition of a HIVIZ sight makes target acquisition much faster and more accurate.